Nested IF example using numeric values

Example: separate a range of values into categories, by testing each value against a series of values.
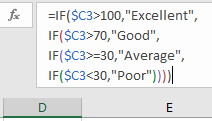
=IF( $C3 > 100, “Excellent”,
IF( $C3 > 70, “Good”,
IF( $C3 >= 30, “Average”,
IF( $C3 < 30,”Poor”,”Error”))))
- Values above 100 will be graded as ‘Excellent’;
- …between 71 and 100 as ‘Good’;
- …between 30 and 70 as ‘Average’;
- …below 30 as ‘Poor’;
- a final catch-all value of ‘Error’ if our values don’t meet any of these conditions.

Key notes about IF statements

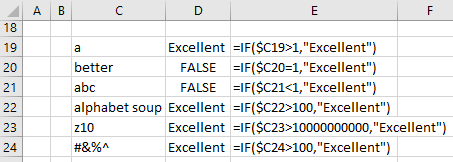
- IF() tests will result in unexpected values when numerical values are being tested but the range includes a text value:
- if we test any text, combined text and numeric, or symbol values against a numeric value the result won’t be as expected, and Excel won’t flag as an error (see examples above).
- so be aware that, if your range of values being evaluated contains any errors or unexpected values, the IF() statement may not highlight them as errors.
- IF() tests aren’t case sensitive
- A2 contains the value ‘Parrot’
- =IF(A2=”Parrot”,”Bird”,”Other”) will result in ‘Bird’ (the TRUE condition outcome)
- =IF(A2=”parrot”,”Bird”,”Other”) will also result in ‘Bird’, even though the condition being tested isn’t an identical match (lower case p) to the value in A2.
Important rules and tips about nested IFs in Excel
- IF() function tests are evaluated in the order presented to Excel.
- Therefore, if using numeric values, the statements need to be provided in numerical order;
- If you want to test a range of values based on whether they are more or less than a set of other values, you can’t test for a small value first and then larger ones …
- … in the example above, if we’d first tested for whether a value is greater than 30, we’d never reach the test for greater than 100 (because any value between 30 and 100 would be TRUE for > 30, and Excel would stop evaluating the rest of the tests).
- You can only find one TRUE result from a nested IF formula. When the first true result is found, Excel stops evaluating the remainder of the formula.
- Split your nested IF statements into separate lines in the formula bar to make them easier to compile and read.
- Excel will help you to identify which closing bracket corresponds to which opening bracket by coloring them in the formula bar. If you place your cursor in the formula bar, the brackets will be colored, and as you move the cursor along the formula, the corresponding pairs of brackets will be highlighted bold.
Related topics
- Excel IFERROR then blank – capture errors and return custom values
